Your First Score
This tutorial will walk you through creating your first score. You will learn:
- How to create a new project
- How to add clefs
- How to use guides to write notes
- Create half-notes and whole-notes
- Create a quarter-note triplet
- How to play your score
- Publish your work to PDF
- How to save your work
Download Project Download a completed Musink project file of this tutorial
Tip If you are using Musink Pro, you will see additional buttons and features that are not in the screenshots below. You do not need to use these features for this tutorial.
Step 1: Installation
Make sure Musink is installed. Click here for installation instructions.
Step 2
Open Musink. From the Welcome Page, choose Start a new project

Step 3: A New Project
Set your new Project up as in the picture below. To do this:
- Press Add Stave
- Name the first stave Drums
- Name the second stave Bass
- Press OK
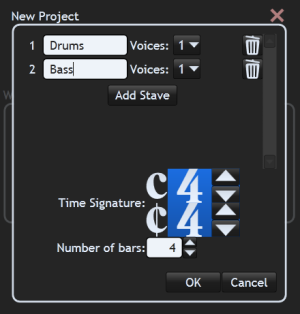
A new project will be created, made up of two staves and four empty bars of music. Each stave will have one voice.

Step 4: Changing Clefs
We want our Bass part to have a Bass Clef.
Tip If you are using Musink Pro, your clefs will already be correctly set. However, performing this step is a good way to learn how to add or change clefs, if you ever need to.
To place a bass clef:
1. In the menu bar, click Marks
2. Click Add Clef
3. Click on the Bass Clef.

4. You will now be asked where to place the bass clef. Notice how a red line follows the mouse.

5. Hover the cursor over the clef on the bottom stave
6. Click the mouse to place the clef
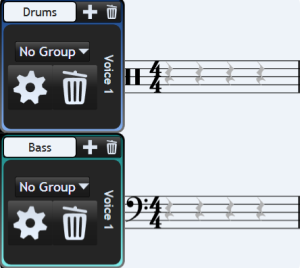
The treble clef will now become a bass clef.
In older versions of Musink, the drum part may have a treble clef by default. You can repeat the above steps to change the clef of the drum part to a neutral clef, if desired.
Step 5: Adding Notes
Let's put down a simple 1, 2, 3, 4 bass-drum beat. Adding notes in Musink is easy:
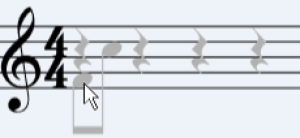
1. Move the mouse over the staves. Notice how grey notes appear under the cursor. These are called guide notes, or guides. When you click a guide note, a note will appear where you clicked.
2. Bass drum beats appear in the bottom space of a stave. Put your cursor on the bottom space of the Drum stave on Bar 1, Beat 1 (under the rest). Click the mouse. A note will be created.

3. Add beats on 2, 3 and 4 in the same way.
Additional info
- If you want to add 16ths or 32nd notes, hover the mouse where you would like those notes, and press the '=' or '+' key on your keyboard. More guide notes will appear, which you can choose from.
- You can also press the '-' (minus/dash/hyphen) key to reduce the number of guide notes.
- If you need to add notes on the same lines as a rest, put the cursor slightly to the right of the rest.
Step 6: Copy And Pasting
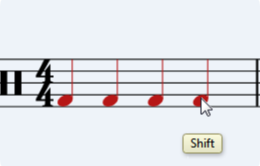
You may have noticed that, when you first create a note, it appears red. This is because the note is selected. Notes can be selected by clicking them. You can also shift-click to select a range of notes, or control-click to select many notes individually. Lets select the notes we have just written, and copy them into the next few bars.
1. Click the first note you created, to select it.
2. Holding shift, click the note on beat four. All four notes will now be selected. (You can now let go of the shift key)
3. Copy the notes by pressing the copy button, or press Control + C on your keyboard
4. Paste the notes by pressing the paste button, or press Control + V on your keyboard
5. You will be asked where you wish to paste the notes. Notice, again, the red line following the mouse
6. Hover the mouse over beat 1 of bar 2 in the drum stave, and click the mouse. The notes will be pasted in Bar 2.


7. Paste the notes again in bar 3 and bar 4 by pressing Control+V and clicking the mouse in the appropriate place.
Step 7: Tuplets
Lets write our bass line. It will include a quarter-note triplet
1. In the bass staff, put an E note on beat 1 and another on 2& in Bar 1.
2. Put an G note on beat 3
3. Lets create a quarter-note triplet. With the note on beat 3 still selected, click the tuplet dropdown

4. Click on the quarter-note triplet. A quarter note triplet will be created for you.

5. Create an E and C note on the triplet's 2nd and 3rd major beats

Step 8: Half-notes
We will now write two half-notes in bar 2 for the bass line
1. Create a B note, beat 1
2. The note we have made is a quarter note. Lets turn it into a half note. Make sure it is selected, then clicking the tuplet drop down and select the half note option. It will now be a half-note.
3. Lets create another minim in a different way. Create an A note, beat 3.
4. Make sure the note is selected, then press Control+2 on the keyboard. It will now be a half note
5. If you like, complete the bass line by copying and pasting the two bars you just wrote into bars 3 and 4.
Tip You can create whole notes in the same way that you just created half-notes. The short cut key for whole notes is Control+1.
Step 9: Playing Your Score
If you like, you can now hear your score. Press the Play Button or press the space bar.
Step 10: Publishing Your Score
Lets convert your score into a PDF by publishing it.
1. In the menu bar, click File
2. Click Publish Project. The publishing window will open. We will publish your project with the standard settings and Template.
 3. Once the loading animation has completed, some text boxes will appear. In the Title field, write “My First Score”.
4. Click Publish. Publishing will begin.
5. Once publishing has completed, you can choose your output format. Click PDF.
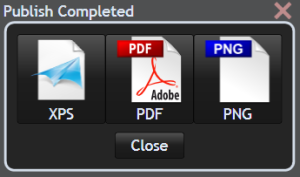 6. Save the PDF where you would like.
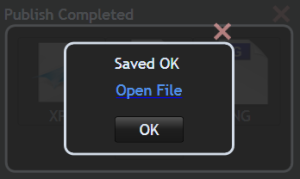
7. You will be told that the project was saved. Click Open File to open the PDF.
Download PDF An Example Published Project
Step 11: Saving your work
To save your work, press the Save Button, or Choose Save Project from the File Menu.
Congratulations! You have just created your first score!
Download Project Download a completed Musink project file of this tutorial
Where To From Here?
If you've got this far, you've already carried out the basic operations of Musink. Well done! It is strongly recommended that you now move onto the follow up tutorial: Understanding how to write in Musink
If you'd still like to read more, here are some topics you may find useful:
- Tutorial on Understanding how to write in Musink
- Tutorial on Note Durations
- An explanation of Staves and Voices
- Using Sections