User Interface
The Main Window

Button Bar
Standard Controls
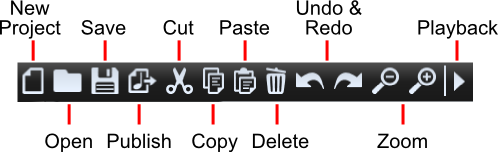 The standard controls in the button bar include
- New Project
- Open
- Save
- Publish
- Cut / Copy / Paste
- Delete
- Undo / Redo
- Zoom In / Zoom Out
- Playback (plays music written)
Copy, Cut, and Paste
Currently, not all items can be copied and pasted. When a note is pasted, it will, where possible, retain the same pitch, tuplet, and marks as the note copied. Notes can be cut and pasted between and across voices.
Guide controls
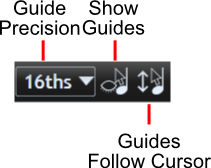 Guide-notes appear in the editor to allow fast note-input. They do not appear in the published score. Some buttons on the button-bar allow you to change how these guides work.
Guide precision
Increases the number of guides in the tuplet of selected notes. For example, to show 32nd-note guides:
- Select a note or rest in the tuplet of interest
- Select “32nds” from the guide precision drop down
Alternately, you can simply hover your mouse over the tuplet of interest and press + or - to add or remove guides, respectively.
Show Guides
Shows or hides guides. This can be useful while editing a score, but not adding any notes. Holding shift also will temporarily hide all guides.
Guides Follow Cursor
While on, guides will follow the cursor vertically. For example, if you have your cursor on the top stave-line, the appropriate guide will move to the top-stave line. While this is off, guides will be available, but will not follow the cursor vertically.
Tuplets
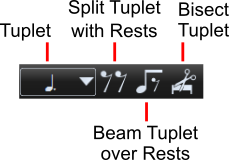 Tuplets are the way that notes are grouped. All note groupings in Musink are referred to as tuplets, including:
- Triplets, Pentuplets, etc
- Whole notes/Semi-breves, Half-notes/Minims, etc
- Dotted durations, such as dotted-quarter notes.
For more information on working with tuplets is available on the tuplets page.
Note and Mark Editing
Stem direction
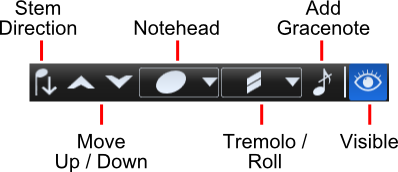
This displays the current stem direction of selected notes. Click to change stem direction. To change the default stem direction, change the voice's settings.
Move Up & Down
Moves objects up or down. This may move
- Notes and rests up or down one line
- Clefs and some other stand-alone marks
- Textmarks above or below the stave
As an alternative to these buttons, you can
- Press the Up or Down keys on your keyboard
- Drag the items with the mouse
Some items have maximum and minimum positions. Clefs, for example, cannot be moved off the stave. Some items, such as accents, cannot be moved vertically, because Musink automatically positions them. Where these marks are positioned can be changed in voice settings.
Notehead
To change a notehead symbol:
- Select the note by clicking on it
- Choose the appropriate notehead, or family of noteheads, from the notehead dropdown.
This dropdown can also be used to quickly change a note to a whole-note or half-note. Note that doing so will change the tuplet of the selected notehead if that tuplet is too short. Noteheads have associated keyboard shortcuts.
Tremolo/Roll
To add tremolo flags to a note:
- Select the note of interest
- Choose a tremolo/drum-roll type
The tremolo chosen refers to the maximum number of flags that the note will display. For example, a 16th note with three tremolo flags selected will have one tremolo flag visible (2 standard flags + 1 tremolo flag = 3 flags). If note durations change, Musink will automatically increase or decrease the number of tremolo flags shown so that your tremolo remains the same. = Buzz Rolls = Buzz rolls are often notated with a “Z” on the stem of a note. To add such a Z:
- Select the note of interest
- Choose the buzz-roll 'Z' from the Tremolo/Roll dropdown
Note that you cannot have both a tremolo flag and a buzz-roll 'Z' on the same note. Buzz-rolls playback as a series of 32nd notes.
Add Gracenote
See Grace Notes for information on how to create and modify grace notes
Publish Visibility
Some rests, marks, and textmarks can be excluded from the published score. For more information, see Publish Visibility.
Stave Brackets
 Musink allows staves to be braced or bracketed together (e.g. to create a grand staff). For more details, see Clefs.

Stave Editors
In the main window, voices that will be published to one stave are grouped together and assigned a colour. To their left is a Stave Editor:
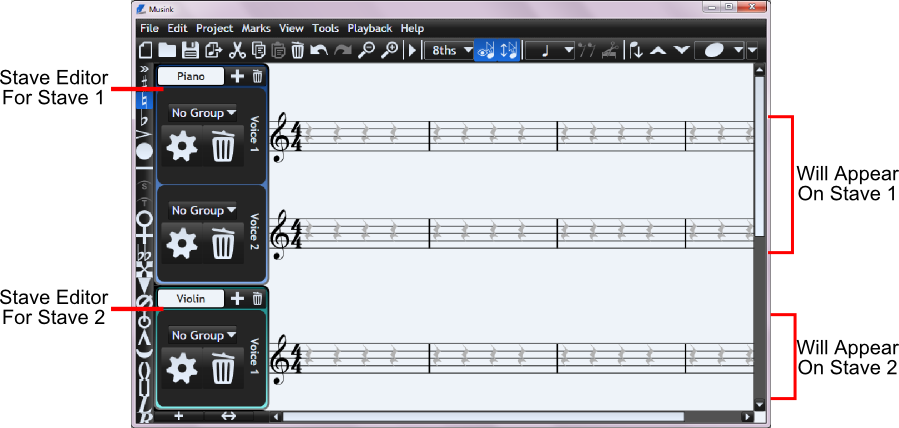 Stave editors let you:
- Delete the stave
- Add voices to the stave
- Set the name of the stave. This name will appear in the sheet-music when it is published.
They also contain controls that allow you to:
- Change voices' settings
- Change voices' group numbers
- Delete voices
- Change the name of each voice. Voice names name do not appear in the sheet-music when it is published.
For more information, see Staves and Voices.
Mark Bar
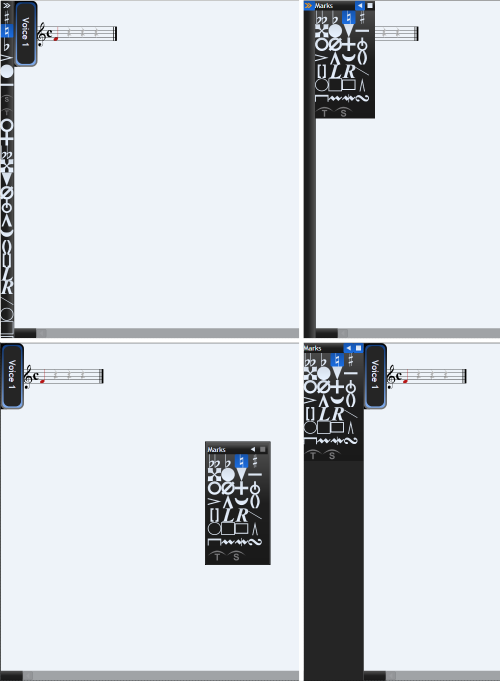
The Mark Bar creates and deletes marks which are directly associated with notes, such as accents. The mark bar is usually docked and collapsed (see image top left). In this state, it may hide some less-used marks. To show these marks expand the mark bar.
Expanding
You can see all available marks in the bar when it is expanded. To expand the bar, hover over the double-arrows at its top: it will remain expanded until you move the mouse away (see image top right).
Docking Expanded
To keep the bar expanded (see image bottom right):
- Expand the bar by hovering over the double-arrows at its top
- Press the square button
To collapse it again, press the square button.
Undocking
To undock the bar so you can drag it around the screen (see image bottom left):
- Expand the bar by hovering over the double-arrows at its top
- Click the triangle button
You can drag the bar around by its top. To re-dock the bar, press the triangle button.