Table of Contents
User Interface
The Template Editor is available in Musink Pro only.
The Template Editor user interface is split into four main areas:
- The Menu Bar
- The Button Bar, to add, remove, and edit template fields
- The Preview Area, which lets you see a preview of your template and drag template fields
- The Right Hand Panel (including the Page Editing Panel), that let you modify the template and its pages

Menu Bar
The Menu Bar contains a variety of functions, including:
- Open, Save, New
- Import and Export
- Changing Units
- Add/View Page
- Template Field positioning and alignment
- Help
Button Bar
The Button Bar contains functions that add, remove, and edit template fields. It also has shortcuts for open, save, and new templates.

1 - 3 New, Open, Save
Creates a new template, opens an existing template for editing, and quick-saves your template.
4 Select Template Field Drop-down
Selects a template field to add, delete, or modify. If the field already exists on the page, you can also click it in the preview area.
5 Add Template Field
Adds a field to the current page of your template. If this is disabled, first select a field with the template field drop-down (4).
6 Delete Template Field
Deletes all currently selected templates.
7-11 Font controls
Set the style, weight, font size, and font family of selected fields. You must add and select a template to use these controls.
12 Centre Within Page
Horizontally centres selected fields within the page.
13 Centre Within Margins
Horizontally centres selected fields within the page margins.
14-17 Align Fields
These controls align selected fields with each other. You must select two or more fields to use these controls.
14 Align Tops
Aligns fields by their top, so that they have the same Y value.
15 Align Bottoms
Aligns fields by their bottom.
16 Align Baselines
Aligns fields by their baselines. The baseline is the imaginary line that letters 'sit on'. The letters j,p,q,and y, for example, have tails that go below the baseline.
17 Align Horizontally
Aligns fields horizontally, so that they have the same X value.
18-19 Position Fields
Directly set the top and horizontal-centre position of select fields. You can also drag fields in the preview area, or use the align controls.
20 Default Text
Sets the default value for a field. Default text is entirely optional for all fields except for page number.
Right Hand Panel
The right hand panel lets you change the template name, note size and add/view/remove pages. It also contains the Page Editing Panel that lets you modify the currently loaded page.
Template Name
Lets you set the name of the template. This can also be set as you save your template.
Note Size
Sets the size of notation in the template. This applies to all pages within the template. An approximation of the note size can be seen in the Preview Area.
Page Selectors
Select the pages that you are editing. If the page you select does not exist, you will be given the option of adding it to the template. For more information, see Template Pages.
Page Delete
Deletes the current page. Your template must always have at least one page.
Page Editing Panel
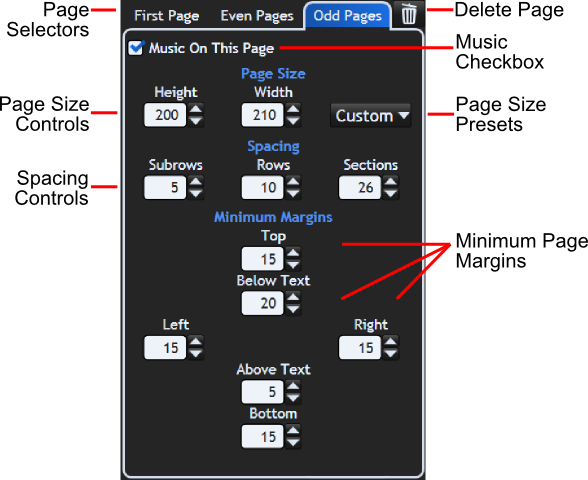
Music Checkbox
Check this if you want the loaded page to contain music. Uncheck this if you want this page to only have template fields, or be blank.
Page Size Controls
Set the width and height of the loaded template. The units used (mm, inches, pixels) can be set via the Menu Bar.
Page Size Presets
Set the width and height to preset sizes, such as A4.
Spacing Controls
Set the space between subrows (staves), rows of music, and sections. The units used (mm, inches, pixels) can be set via the Menu Bar.
Minimum Margins
Set the margins of the loaded page. See Margins for more details.
Preview Area
The Preview Area lets you see an approximation of how your template will appear when published. The preview area automatically zooms as large as it can to fit your score in view. You can change which page you are viewing by using the Page Selectors in the Right Hand Panel.
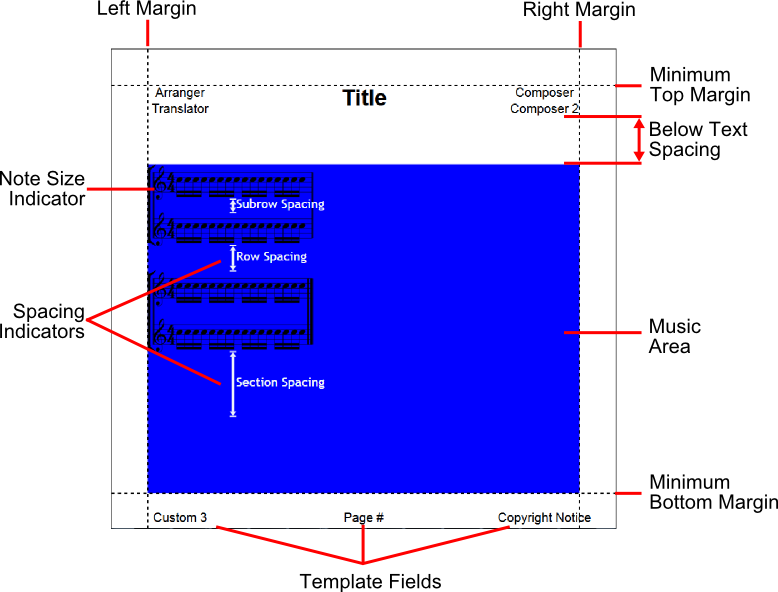
Template Fields
These are the titles and other fields you have placed on your page. Click to select, and drag to move.
Music Area
The blue area shows the area of your page that music will be placed in, if the template is published using all template fields. If fewer fields are used during publishing, there may be more room available for music.
Left and Right Margins
Show how close to the left- and right-hand side of your page music will come. Use the Page Editing Panel to change these values. See Margins for more details.
Minimum Top and Bottom Margins
Show the highest and lowest your music may come on the page (ignoring fields). Use the Page Editing Panel to change these values. See Margins for more details.
Above and Below Text Spacing
Use the Page Editing Panel to change these values. See Margins for more details.
Note Size Indicator
Shows approximately how large your notes will be on the page. Use the Right Hand Panel to change note size. This indicator will always show two subrows and two rows, as a single section. Each row will be a single bar long. It will not show additional bars or rows as the page resizes.
Spacing indicators
Shows the distance between subrows (staves), rows, and sections. Use the Page Editing Panel to change these values.