Table of Contents
Stave and Voice Settings
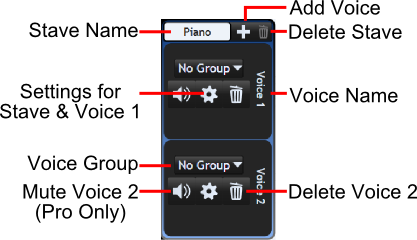
Settings for individual voices and their parent staves can be set by clicking the settings button, next to that voice. In the window that appears, settings are split into those that apply to that voice only (at the top) and those that apply to the entire stave (at the bottom).
Voice Settings
Default Stem Direction
Sets whether stems point upward or downward by default. With the Auto setting, the stem direction for each tuplet will automatically change based on the pitches of the notes you create.
Split tuplets by default
When checked, tuplets are automatically in force split mode.
Hide stems, tails, beams
Makes all stems, tails and beams between notes invisible during both editing and publishing. This function is often utilised for drum keys and for teaching, where note stems are not useful.
Midi Channel
Sets which MIDI channel this voice plays through. It is usually best to avoid using a MIDI channel for more than one voice (with exception of percussion). MIDI channels are automatically set to the next free channel when a voice is created. Note that, in accordance with the MIDI standard, MIDI channel 10 is reserved for percussion and drums.
Midi Instrument
Sets which instrument this voice should play as. Note that not all instruments necessarily supported by all playback devices.
See setting_instruments for more details on this function.
Tune Midi
This setting is available in Musink Pro only.
Tune Midi transposes your score as it is played back by the set number of semitones. Note that this transposition does not affect how notes appear, just how notes are played. For example, a B-flat instrument sounds one semitone lower than the notes appear.
To transpose in instrument up a number of semitones, put a positive number in this box. To transpose down, put a negative number in this box. For example, for an instrument that sounds 4 semitones lower than written, put -4 in this box.
Placements
These set the placement of marks which are associated with notes. These settings apply to scores both while they are being edited and when they are published.
Placement
Sets where on the note, or stem, the marks appear:
| Option | Placement |
|---|---|
| Note End | Always appears near the notehead itself. If stems are upward, the mark will appear below the note, and vice versa |
| Stem End | Always appears near end of the stem. If stems are upward, the mark will appear above the stem, and vice versa |
| Above Note | Always appears above the note and stem, regardless of the stem direction |
| Below Note | Always appears below the note and stem, regardless of the stem direction |
Keep off stave
When checked, ensures that the mark does not ever appear among the stavelines. If the mark does need to be placed near the stave lines, it will be moved above or below. This setting often improves readability.
Stave Settings
Fermata Placement
Sets whether fermatas (pauses) appear above or below the stave
Tuplet Bracket Placement
Sets where tuplet brackets are placed. When this setting is Auto, tuplet brackets appear above stems that face upward, or below stems that face downward.
Tuplet brackets range over grace notes
When set to Yes, tuplet brackets are extended horizontally to range over grace notes.
Crescendo Placement
Sets whether crescendos appear above or below the stave
Allow Bar Numbers
When unchecked, bar numbers will not appear in this stave. When checked, bar numbers will appear for this stave.
Note that Bar numbering needs to be switched on for this section in order for this setting to have an effect.
Default Buttons
The To Default button sets all of the above settings to the default values. The To Drum Default button sets all of the above settings to default settings for percussion.