Table of Contents
Tips for Percussionists
Video Tutorial
A detailed walkthrough tutorial for creating basic drum music is available below. This video does not cover all topics on this page.
Setting Up Your Project
Instructions below are for a drum kit, assuming you would like two voices (See Voices, below for an explanation). If you are writing for other untuned percussion, simply leave Voices set to 1 when doing these steps.
Musink Pro
This is easy in Musink Pro:
- Create a new Project. A New Project Window will open.
- Set the name of the stave to drums
- Set Voices to 2
- Click OK
Everything will be set up. If you would like the stems for one voice to point downwards by default, you can set this in the voice settings.
Musink Lite
This takes longer in Musink Lite than in Musink Pro.
- Complete all steps for Musink Pro, above
- Change the stave to a neutral stave. See Placing Marks here.
- Open voice and stave settings for the first voice
- Click the button To Drum Default
- Click OK
- Open voice and stave settings for the second voice
- Click the button To Drum Default
- If you would like to have these stems pointing downwards by default, change this setting now.
- Click OK
Marks
Musink supports marks used commonly by drummers and percussionists. Many of these marks will directly affect playback.
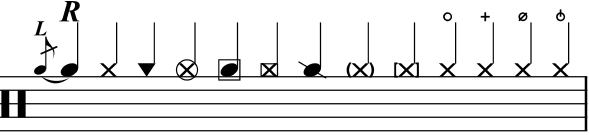
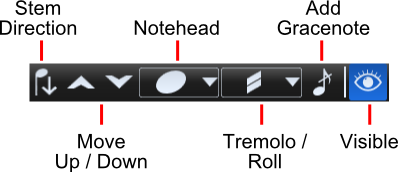
Notehead modifiers
- Hollow circle for crash-cymbal or cross-stick
- Hollow squares for cross-stick and ride-bell (large and small)
- Strike-through for rim-shot
Ghost notes
- Round brackets
- Square brackets
- Anti-accent mark
Hi-hat modifiers
- Open hi-hat
- Closed hi-hat
- Half-open hi-hat (HOH)
Sticking
- Left and Right sticking marks
Note that sticking marks can be added to gracenotes (such as for flams). Sticking can alternatively be added as a text mark.
Noteheads
Musink supports three notehead families: round, X, and percussion. For more information, see writing notes.
Playback
Setting to Percussion
To have a voice playback as a percussion or a drumkit, use the voice-settings to set the instrument to Percussion. It is also a good idea to press the Set To Drum Default button to ensure notes appear as arranged for drums.
Rules
Standardised Notation
MIDI output from Musink follows the rules layed down in the book Guide to Standardized Drumset Notation by Norman Weinberg (as is supported by the Percussive Arts Society). These 'standardised' rules, however, do not please everybody. As such, a number of extra symbols and note positions have been added in addition to the 'standardised' rules. These additional rules include:
- Circles around cymbal marks are interpreted as crash cymbals
- Square marks around cymbal marks are interpreted as cymbal-bells
- Square marks around snare drum marks indicate cross-stick (X notehead type only)

Download Project Download a Musink Project of the full Musink drum map, above
MIDI
Please note that, according to the General MIDI specification:
- Only one MIDI channel can represent percussion
- That MIDI channel is always channel 10
As such, it is not possible for Musink to output percussion through any channel except Channel 10. There are, however, a few percussive instruments which MIDI does not consider 'percussion'. These can (and must) appear on other channels:
- Tinkle Bell
- Agogo
- Steel Drums
- Woodblock
- Taiko Drum
- Melodic Tom
- Synth Drum
- Reverse Cymbal
Rolls
To place drum rolls (open or buzz):
- Select the note you wish to add the roll to
- Select the roll type from the roll/tremolo drop down
Buzz rolls and 32nd-note rolls play back as a series of 32nd notes.
Video Available A short tutorial on drum rolls is available on the List of Video Tutorials page
Voices
Music for the drum kit is typically appears on a single stave in two voices. For example, it is common to connect the stems of the snare to the bass drum, but not the cymbals. There are two ways to write this in Musink:
Using Two Voices
Create a stave with two voices. In the top voice, write your cymbals. In the second voice, write your other drums, such as snare and bass drum. When you publish your score to PDF, the two voices will overlap one another, but their stems will not combine. Writing on two voices can be fast, but may not be ideal for very complicated music.
Download Project An example Musink project using two voices to create a drum part
Using Voice Groups
If you wish to write your snare drum, bass drum, and/or tom-toms separately, but have them 'combine' together in the final PDF, use voice groups. Using voice groups often makes writing complex music easier. It can also be useful if you are unsure about which drums you want to combine. Detail on voice groups can be found on the voice groups page. In short:
- Create a voice for each section of the drumkit (e.g one for cymbals, one for bass drum, one for snare and tom-toms)
- Set your bass drum, snare and tom-tom voices to the same voice-group
- Write your music with each part in its own voice
- When you publish, the voices with the same voice-group will combine stems, rests, and note durations
Hiding Rests
It can be common to want to hide rests from cymbals during a fill. Rests can be hidden from published scores by selecting the rest and pressing the publish visibility button.