Writing Drums in Musink Pro
This tutorial is for people who have not used Musink Pro before and would like to write music specifically for the drum kit. You will learn:
- That drum music is usually two voices
- How to create a new project
- How to use guides to write notes
- How to change note heads to cymbal Xs
- How to group notes
- How to play your score
- How to create a PDF
- Some fundamentals for customising a PDF
Tip
If you would prefer to watch a video tutorial or are using Musink Lite, visit the general help for percussionists.
Drum Music and Musink
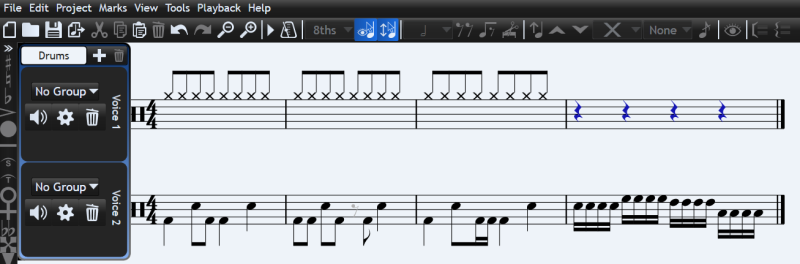
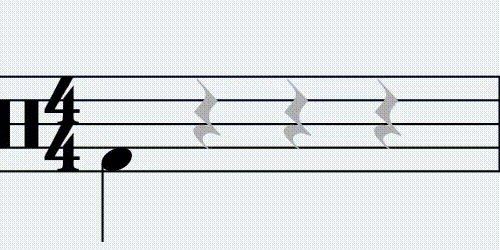
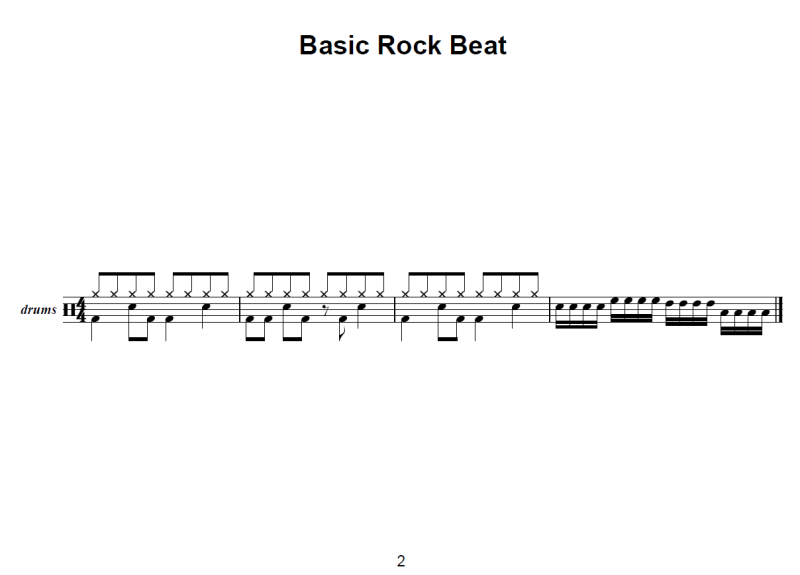
Music for the drumkit is usually made up of two voices. A voice just means music where the stems are connected. For example, in image below is a PDF made in Musink. You can see the bass drum and snare are connected to each other - they are in the same voice. They are not connected to the cymbals - this is a second voice.

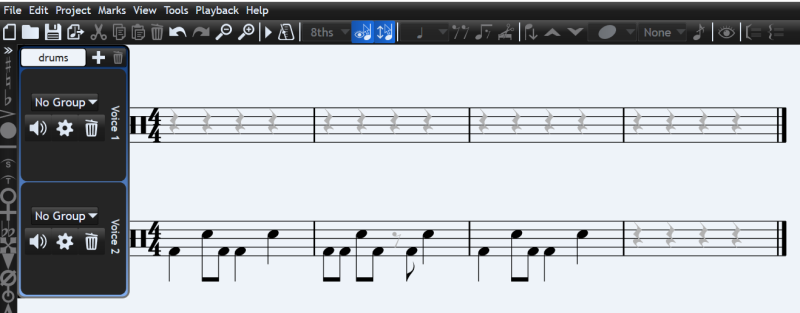
The image below shows how this looks in Musink. You can see that the two voices are separated. Musink shows them separated while you are writing, but when you make a PDF, it will combine them for you.
Step 1: Create a New Project
Let's start a new project to write the music we have seen above.
1. Open Musink and select Start a new project
2. Click on <Name> and change it to drums
3. Change Voices to 2
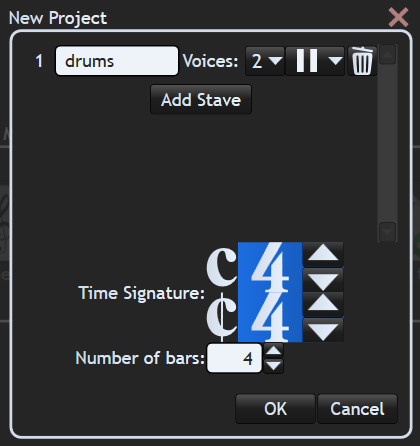
4. Press OK
Step 2: Writing Snare and Bass Drum Notes
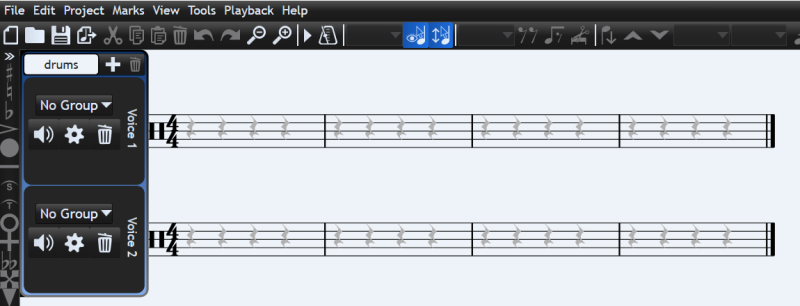
You will see a screen similar to that below. The top line will be for your cymbals and the bottom line will be for your snare drum and bass drum:
Optional Step
If you prefer your bass and snare notes to have stems pointed down:
1. Click the gear icon for Voice 2
2. At the top of the window, set Default stem direction to Down
3. Press OK
Let's write our first two bars (measures) of music only. Adding notes in Musink is easy:
1. Move the mouse over the staves. Notice how grey notes appear under the cursor. These are called guide notes, or guides. When you click a guide note, a note will appear where you clicked.
2. Bass drum beats appear in the bottom space of a stave. Put your cursor on the bottom space of the Drum stave on Bar 1, Beat 1 (under the rest). Click the mouse. A note will be created.

3. Add the first snare drum beat. To do this, move the mouse slightly to the right of the rest. The guide note will follow your cursor. Click on the note when you are over the correct space.
Tip
Adding notes can be easier if you zoom in. Using the magnifying glass icon to zoom in.
4. Add more notes to the other bars until your score looks like the one below.
Step 3: Writing 16ths
Let's start writing a fill by adding four 16ths on the snare drum.
1. Add a snare drum beat on Beat 1 on Bar 4.
2. Keep your mouse over the beat you just added. You will see there are only 8th notes available. Press the + button on your keyboard.
3. 16th guide notes now are available. Add snare beats on 1e, 1&, and 1a.
Step 4: Copy, Paste, and Moving Notes
You can copy paste, and move notes to complete your fill quickly.
1. In the last bar, click the note on Beat 1
2. Holding Shift, click the note on Beat 1e. You will now have four notes selected.
3. Press Control C to copy your notes, or click the copy button
4. Press Control V to paste your notes, or press the paste button
5. You will be prompted to choose a location to paste. Click on Beat 2
6. Move these notes to Tom 1, by pressing the up key twice on your keyboard.
7. Press Control V again, and this time click on Beat 3.
8. Press up once to move these to Tom 2
9. Press Control V again, and this time click on Beat 4.
10. Press down twice to move these to the floor tom

Step 5: Hi-hat and note groupings
Let's add our hi-hat notes. We will have these in groups of four 8ths.
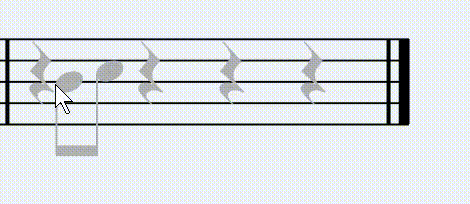
1. In the top voice, click on Beat 1 on any line.
2. Press up on your keyboard, or drag the note with your mouse to above the stave, where hi-hats are shown.
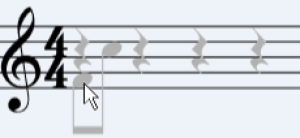
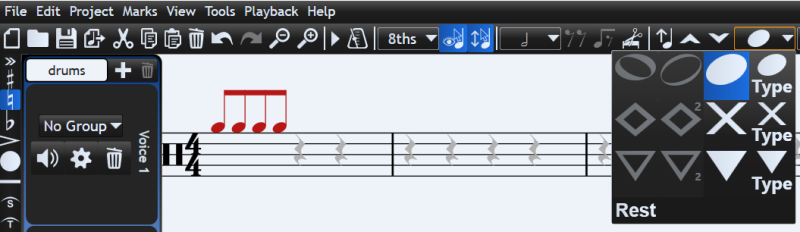
3. Convert the note into a half note by pressing h on your keyboard, or using the menu shown in the image below. A half note contains four 8th notes. This means that as we add more 8th notes, they will be grouped together in a group of four.
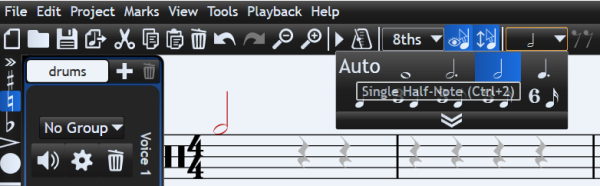
This can seem unintuitive until you start to write. For a hint, look at the grey guide notes. They will show you four 8ths grouped together. This is what will happen if you add more 8th notes.
Tip You can also use this to group notes in other ways or to make triplets.
3. Add notes on 1&, 2, 2& by clicking the guides.
4. Let's change the symbols to X. First, select the select the four hi-hat notes by clicking the note on 1, then shift+clicking the note on 2&
5. Press Shift X on your keyboard or choose X from the Symbol dropdown
6. Copy and paste your hi-hat notes onto Beat 3 of Bar 1
7. Paste your notes so you have hi-hat 8th notes throughout Bar 2 and Bar 3 (you will have to press Control+V and click several times)

Step 6: Playing and creating a PDF
Your score is almost ready. To play it from start to end, find the play button - it is next to the metronome icon.
Let's create a PDF. Creating a PDF in Musink is called Publishing.
1. From the main menu, choose File, then Publish Project…
2. A window will appear. Click Publish when the button becomes available.
3. Choose PDF when prompted
4. Save the file.
5. Click Open File when offered.
Look at your PDF. You will notice the two voices now overlap. You might also notice:
- In the last bar, there is a whole-note rest that overlaps your fill.
- The first page is blank. This is because we have not given it a title yet.
- The music doesn't fit on one line.
Let's fix these things up.
Hide the rests
Rests can be hidden from publishing. This only is usually useful when we have fills.
6. Close your PDF Viewer, and the notifications in Musink
7. Click on the rest in Bar 4, Beat 1
8. Holding control, click on the other rests in this bar
9. Look for an eye icon and click it.
10. Click away from the rests. You will see they are blue. This means they will not appear in the PDF any more.
Use a wider page
Our notes didn't fit on the page. You can change your page layout by picking a different template. You can choose a built-in template, or design your own using the template designer.
11. Click on Publish again
12. At the top of the window it will say “Standard”. Click Change…
13. Click Get All Templates, select Standard (Landscape), then click OK
Add a title
14. Scroll down the Window until you see a series of text boxes.
15. Write a title for your music, like “Basic Rock Beat”

16. Press Publish
17. Save and open the PDF again.
Notice:
- The page size is different
- You have a title on the page
- The rest no longer appears
Where to from here?
Well done! You've now practised most of the fundamentals to write drum music properly.
If you're writing drum exercises, it can be worthwhile to read about:
- Using sections
- Understanding the difference between staves and voices
- Merging voices with voice groups
- Making drum keys
- Publishing and Templates
There is also a getting started tutorial for other instruments which can teach you some fundamentals not shown here.