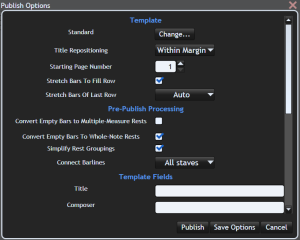
Publish options
A number of publishing options are available to customise how a published score appears. Publishing options will only affect the published document; they do not change how the project appears in the Music Editing Area.
Changing Publish Options
Publishing options are set in the Publish Window just before you publish. To change publish options
- Launch the publish window. For instructions on how to do this, see the publishing overview or the Your First Score tutorial.
- Change the options you wish
- Press Publish to save your options and publish. Alternately, press Save Options to save your options, then press Cancel to close the window.
Available Options
Template
Template
Templates define the overall page layout of your published score. For more information, see Templates. To change the template:
- If a busy animation is in progress, wait for it to cease
- Click Change
- In the window that appears, either search for templates or click Get All Templates
- Browse through the templates shown. You can press the preview button for a larger view of a template. While previewing a template, click the image to see the next page.
- Click a template
- Click OK to return to the publish window
Title Repositioning
Sometimes, a title may be so long that it goes off the edge of the page, or beyond the page margins. Title repositioning states whether to keep titles:
- Within the Page, or
- Within the Page Margins, or
- To not reposition titles that are large
Title repositioning only affects the horizontal position of a title. It does not affect the vertical placement of titles
Starting Page Number
Sets the starting page, and where page numbering starts counting from. Note that, if this is a value other than 1, templates with a special first page will not skip the special first page.
Stretch Bars To Fill Rows
Sets whether bars are stretched so that the full margin-width of the page is used.
Stretch Bars Of Last Row
Sets whether the last row of each section is stretched to fill the full margin-width of the page. The auto setting of this will stretch the last row if it is over a certain width; very short rows will not be stretched.
Pre-Publish Processing
Convert Repeating Bars to Simile Marks
If one bar is a copy of the previous, it is converted to a simile mark. See simile marks for more information.

Multiple Measure Rests
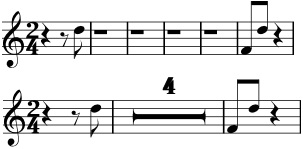
Multiple-measure rests are created during publishing; they cannot be created manually in the music editing area.
The Convert Empty Bars To Multiple Measure Rests option sets whether empty bars are converted into a multiple-measure rest. When this option is on, you will be able to choose the minimum number of empty bars in a row before a multiple-measure rest is created.
Multi-measure rests are only created in bars that only contain auto (gray) rests or bar numbers. Any bars containing confirmed (black/red/blue) rests, marks, text, or notes of any kind will not have a multiple-measure rest created in them. This means that you can stop a multiple-measure rest appearing in a specific bar by simply clicking one of the rests.
Convert Empty Bars To Whole-Note Rests
Sets whether Musink should automatically replace all rests in empty bars with a single whole-note rest. This only affects bars which have no notes and no confirmed (black/red/blue) rests. This function does not affect whether multiple-measure rests are created.
Simplify Rest Groupings
Sets whether auto (gray) rests in compound time signatures should be simplified to dotted durations, where appropriate.
Connect Barlines
Sets which staves should have their barlines connected vertically.
Template Fields
Template Fields are the titles that appear on the page. A variety of these are available, such as Title, Composer, Arranger, and Page Number. Each template makes different fields available; the fields you see in the Publish Window are those available to the template you have currently selected.
Where will they appear?
To see how fields are used in a template:
- Note the name of your template
- Click the Change button
- Search for your template by name, or browse through all templates to find it
- Press Preview to see a preview of your template. The fields in the preview will be visible
- Click the image to move to the next page
- When you have finished, close the preview window
- Press Cancel in the Change Template window to return to the publish window
Which Should I Use?
You can use as many or few as you wish. If you do not use a field, publishing will generally try to use that space for music.
Page Numbers
Most templates will let you change how the bar numbers are formatted. You can write anything you wish in the Page Number field, but ensure you include a hash (#) to say where the page number appears. For example:
| As Published | |||
|---|---|---|---|
| In publish window | Page One | Page Two | |
| -#- | -1- | -2- | etc |
| Page # | Page 1 | Page 2 | etc |
| (#) | (1) | (2) | etc |
| I # a worm | I 1 a worm | I 2 a worm | etc |
| etc | etc | etc | |
Sections
Include Section
Specifies whether a section should be included in the published score.
Start On New Page
Specifies whether a section should start on a new page.
Show Stave Names
Sets how often to show stave names.
- Never: Stave names will never be shown
- Every Row: Stave names appear on every row
- Start Of Each Page: Stave names will appear for the top row of each page
- Start Of Section: Stave names will appear once for this section, at the start of the section