Staves and Voices
Each section in a document has at least one stave of music. In turn, each stave of music has at least one voice.
Understanding Voices
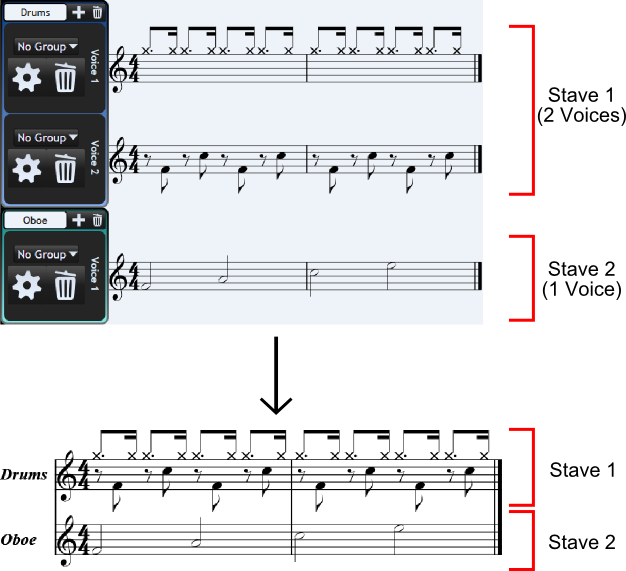
Each stave has one or more voices. In the music editing area, voices appear separated. This allows you to more quickly write music. When publishing takes place, voices from the same stave are placed together:
Stave Editors
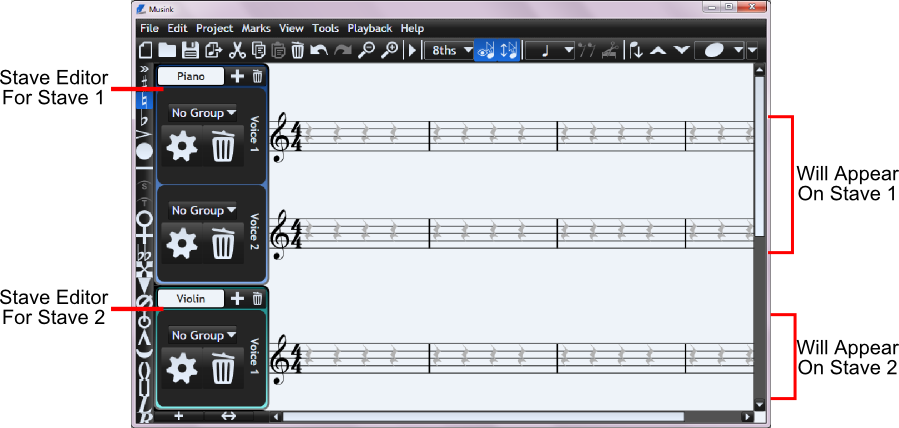
In the main window, voices which will be published to one stave are grouped together and assigned a colour. To their left is a Stave Editor:
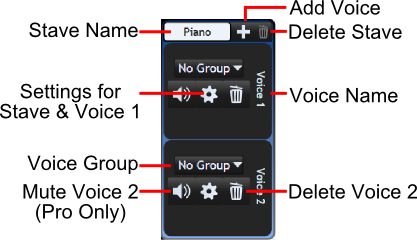
 Stave editors let you:
- Delete the stave
- Add voices to the stave
- Set the name of the stave. This name will appear in the sheet-music when it is published.
They also contain controls that allow you to:
- Change voices' settings
- Change voices' group numbers
- Delete voices
- Change the name of each voice. Voice names name do not appear in the sheet-music when it is published.
To hide stave editors, double click on their black background. To expand hidden stave editors, click once on them.
Adding and Deleting
Adding Staves
To add a stave, either:
- Press the Add Stave (+) button down the bottom left of the main window
OR
- From the menu bar, click Project
- Click Add Stave
You new stave will appear below other staves in the main window.
Deleting Staves
To delete a stave:
- Make sure that the stave editor is not hidden. If it is hidden, click it to expand.
- Click the delete button in the top right hand corner of the stave editor.
Note that all sections must have at least one stave. If there is only one stave in the section, you will not be able to delete it.
Adding Voices
To add a voice to a stave:
- Make sure that the stave editor is not hidden. If it is hidden, click it to expand
- Press the + button on that stave's stave editor (see image above). This is NOT the button down the bottom left of the page
Deleting Voices
To delete a voice:
- Make sure that the stave editor is not hidden. If it is hidden, click it to expand
- Press the delete button (a trashcan) beside that voice
Note that all staves must have at least one voice. If there is only one voice in the stave, deleting that voice will also delete its stave.
Changing Stave and Voice Settings
Some settings can be set for individual voices, and some always apply to an entire stave:
- To change the settings of a voice, click the 'settings' button next to that voice.
- To change the settings of a stave, click the 'settings' button of any voice in that stave. Stave settings are at the bottom of the window that opens.
For details on stave and voice settings, see Stave and Voice Settings.
Names
Stave Names
Stave names appear in scores which are published. To change the name of a stave:
- Make sure that the stave editor is not hidden. If it is hidden, click it to expand.
- Click on the textbox at the top of a control
- Type in a new stave name
- Click away from where you are typing, to finish
Voice Names
Voice names do not appear in scores which are published. Voice names can be useful to set for your own reference while composing a score. For example, they may help you remember that Voice 1 is a snare drum, while Voice 2 is a bass drum. To change the name of a voice:
- Make sure that the stave editor is not hidden. If it is hidden, click it to expand.
- Click on the voice name
- Type in a new voice name
- Click away from where you are typing, to finish
Voice Groups
Voices with the same group number are merged into a single voice during publishing. For more information, see Voice Groups.
Voice Volume and Muting
See MIDI Modifiers and Channel Volume.