Standalone Marks
Musink supports creation of many standalone marks, including:
- Clefs
- Key Signatures
- Volta brackets
- Pedal Directions
- Caesuras ('Railroad tracks')
- Fermatas
- Coda and Segno marks
- Crescendos and Decrescendos
- Line breaks and Bar links
For marks associated with notes, such as accents, see non-standalone marks.
There are also dedicated help pages for time signatures and MIDI marks.
For placing text, see this page.
Placing Marks
The general procedure for placing a mark is as follows:
- Select Marks from the Menu Bar
- Select the mark you want from the menu, or from a sub menu
- Place your mouse where you would like the mark.
- Click the mouse and the mark will be placed
- If you are given the option to keep adding marks, you can press escape to cancel.
Clefs
Musink supports the following clefs:
- Treble (G)
- Bass (F)
- Alto / Tenor / Soprano (C)
- Neutral (x2; for percussion; interpreted as G if used with tuned stave)
- Octave-shifted G and F clefs
- Double-octave-shifted G and F clefs
Clefs can be dragged up and down a stave, within certain limits, just as notes can be.
Adding a clef will not change the pitch of any note following; the positions of notes are automatically adjusted to retain the original pitch.
Grand Staff
It is common in piano and multi-stave music to brace or bracket staves together. Musink allows staves to be both bracketed and braced at the same time. A stave cannot have more than one brace or more than one bracket.
Hint If you are using Musink Pro, grand staves are usually set up automatically when you first create your project. You can also these up (manually) when you first create your project, by selecting them from the clef drop down in the New Project Window.
 To bracket or brace staves:
- Ensure your section has at least two staves
- Holding shift, double-click a bar in the top stave you wish to brace
- Holding shift, double-click a bar in the bottom stave you wish to brace
- Press the bracket or brace button in the Button Bar
Example score with square-bracketed staves
Example score with Curly-braced staves
To remove a bracket or brace from a stave:
- Holding shift, double-click a bar in the stave you wish to remove the brace or bracket from
- Press the brace button to remove a brace, or the bracket button to remove a bracket
Common Problems
Adding Clef On One Stave Adds/Changes Clef On Other Staves
You have probably have misunderstood the difference between voices and staves; you have multiple voices. Try adding a second stave instead, then try again.
Cannot Select Bar
When selecting a bar to create a grand stave, ensure that:
- You are holding shift
- Guides are hidden once you hold shift down. If this does not occur, turn off guides using the button bar
- You double click the left button of the mouse
- When you double click, you do so over the stave lines of that bar
- When you double click, you do not click on any marks, text, notes, or rests
Coda
After placing a coda, you may be asked if you wish to add a coda section. If you choose Add Section, you will be automatically switched to that section.
Key Signatures
Adding a key signature will not change the pitch of any note following; the positions of notes are automatically adjusted to retain the original pitch. If two key signatures of the same type are in a row, the second will automatically be deleted.
Simile Marks (Repeat Previous Bar/s)

Simile Marks are available in Musink Pro only.
Simile Marks (repeat previous bar and repeat previous 2-bars) are currently in Musink as a Beta feature. These marks are created during publishing to PDF.
There are two ways to create these marks
Method 1: Copy the bar
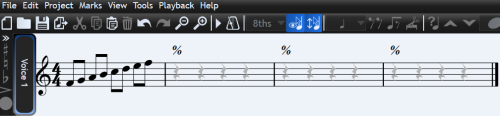
Bars that are identical, and are not entirely rests, will automatically convert to simile marks during publishing.
1. Write your first bar of music
2. Use shift + left click to select all notes and marks in the bar
3. Copy the notes and marks using the copy button on the button bar, or pressing control + C
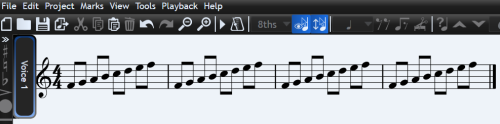
4. Paste the notes into the next bar(s)
5. Choose File, Publish from the Menu Bar
6. Select Convert repeating bars to simile marks.
7. Press publish and save as a PDF. Your PDF will show the second bar as a simile mark.

Method 2: Force a simile mark
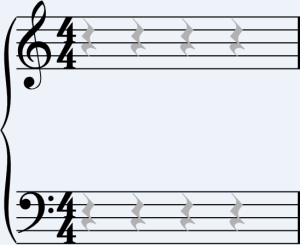
You can force a bar to contain a simile mark during publishing by placing a textmark in it that only contains a percentage sign.
1. Add a offsetting text mark to the bar
2. Double-click the text mark to edit it
3. Type % (a percentage sign)
4. Click away from the text mark to stop editing it
5. Choose File, Publish from the Menu Bar
6. Select Convert repeating bars to simile marks.
7. Press publish and save as a PDF. Your bar containing a percentage sign will show a simile mark.
Workaround for Old Versions
If you cannot install Musink Pro 1.3.1.0 or later, you can manually add simile marks after publishing. This process is slow however, and upgrading to Musink Pro 1.3.1.0 or later is strongly advised.
To do so:
1. Delete all items in the bar(s) you wish to put the repeat sign in
2. Select all rests and click the publish visibility button to hide them from publishing. Once you deselect the rests, they will appear blue

3. Publish your score in the usual manner and save as PNG or PDF
4a. If you are a Musink Pro customer, contact support and request a high-quality image of a repeat mark
4b. If you have Musink Lite, find an image of a repeat mark online
4c. If you would rather, you can print your score and draw the mark in by hand
5. Open your published work in an image editor or PDF editor
6. Copy and Paste your repeat-mark image into the PNG or PDF and save the result

Tutorial Available If you would like a broader tutorial on editing after publication, see Editing your Music Score PDF after Publishing
Volta Brackets
When adding volta brackets, add from left to right to ensure that numbering is correct. You can also manually change numbers by double-clicking the number itself. For more information, see Text Marks.