Writing Notes
Musink introduces the concept of guide notes ('guides' for short). Guides are grey notes which appear under the cursor in the music editing area. Clicking on a guide note will create an actual note at that location. Guides are used for entering notes only; they do not appear in the published score. For more information on how to add, remove, or hide guides, see this article.
Tutorial Video
The following video contains a brief overview of writing notes. For more information, such as how to create rests, read below.
Creating Notes
To write notes, simply:
1. Move your mouse where you would like a note.
If you wish to add a note exactly where a rest appears, move your cursor slightly to the right of that rest.
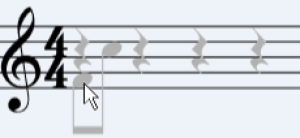
2. Click on the guide note that appears under the cursor.

If you would like greater or fewer guides, see guides on how to add or remove them.
Creating Rests
To write a rest:
- Create a note
- Press the r key or select rest from the notehead dropdown.
Note Durations
Musink automatically calculates note/rest durations based on the tuplet, and surrounding notes and rests.
To change the duration of a note, either:
- Add or delete a rest after it
- Change, or bisect, its tuplet (this includes for half and whole-notes)
- Change its notehead to a half-note, whole-note, or shorter note, using the notehead dropdown, or a keyboard shortcut.
Auto Rests
Rests which appear gray are called auto rests. These are rests that Musink has automatically created for you. Some key points are:
- Musink will will automatically create and delete rests as you require them
- Auto rests appear are only grey in the music editing area. They appear black when published.
- Clicking an auto rest will force a rest to appear in that location. Musink will not delete a black rest.
- Clicking auto rests is a way of purposefully preventing some publishing features, such as multi-measure rests, from modifying a bar.
- To convert a confirmed (black) rest to an auto rest, simply delete it.
Noteheads
Types
Musink supports three notehead types:
- Round (Standard)
- X (Half and whole notes appear as diamond)
- Percussion (Triangle; half and whole notes appear as hollow triangle)
Changing
To change the notehead of a note or gracenote:
- Select the note or gracenote
- Select the approprate type from the notehead drop down, or press the appropriate shortcut key
By selecting many notes in the first step, you can change noteheads of an entire group in one go.
Position
You can change the vertical position of notes by selecting (clicking) them and either:
- Dragging them with your mouse
- Pressing the Up or Down keys on your keyboard
- Pressing the Up or Down buttons on the button bar
You can select many notes at once by holding the Shift key, and/or Control key on your keyboard while clicking notes.
If you wish to drag rests off the stave, and you cannot, check that this is allowed according to your settings. To change these settings:
- Select Tools then Settings from the menu bar
- Expand Notes, Rests and Marks
- Uncheck Rests must fall on the stave
- Press OK
To add accidentals, see Non-Standalone Marks, or Keyboard Shortcuts.
Ledger Lines
Initially, guide-notes will not appear significantly above or below the stave. To create a note on a ledger line:
- Create a note on the stave
- Drag that note to the pitch you want, above or below the stave
- Guide-notes will now appear on ledger lines for that voice. You can use these guides to create additional notes on ledger lines.